 German (Germany)
 English (United States)
 Spanish (Spain)
 French (France)
 Russian (Russia)
Lernzentrum
Top Coat Success
Montag, 11. Juli 2011
Automatic taping tools maximize efficiency, quality and productivity on the job site.
In our last article, “Master the Taping Process,” I detailed a step-by-step review of the taping process covering butt joints, flat joints and angle joints using automatic taping and finishing tools. In this article, we’ll delve into the next sequence of events, the topping coat process, again using automatic taping and finishing tools to maximize efficiency, quality and productivity.
In the missing area, all-purpose or topping-joint compounds are slightly thinned down with water, using a drill and paddle or hand mixer to a thick and creamy consistency for use in a flat box. Mix the compound with consideration to the manufacturer’s recommendations and climatic conditions. Prepared compound should be placed on a protected, easy-to-clean surface (i.e. scrap of drywall).
For convenience, a cart or a four-foot baker scaffold can be used as a mobile work platform for carrying buckets (water and compound), cleanup brush, tools and a scrap container. This allows the tools and materials to be kept closer to the work area and saves steps.
FIRST BOX COAT
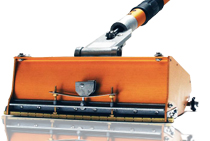
The flat box applies compound over taped joints and is designed to produce consistent, uniform results. The flat box is available in7-, 10-, and 12-inch widths and is attached to specially designed handles in lengths from three to six feet. The different lengths compensate for the variety in worker’s sizes and ceiling heights. The handles are secured to the flat box by two wing nuts.
The flat box has an adjustable metal blade that trowels the compound and feathers the edge for a precise crown. The amount of crown left by the box is controlled by changing the setting on the crown adjustment dial. At the #5 setting, the blade is restrained, leaving practically no crown. At the #1 setting, the blade is free to leave the highest crown possible. Apply topping coats with plenty of crown to allow for normal shrinkage leaving a flat dry surface.
The flat box has a hinged pressure plate. When the box is full of compound, pressure on the handle forces the pressure plate forward and pushes compound out through the slot in the faceplate. A steel blade then smoothes the compound to a uniform thickness, leaving it slightly crowned over the center line of the joint.
To fill the box, use the slot adapter on the loading pump and insert it into the open slot of the flat box. Pump and fill on one side, then the other, until the box is visibly full of compound.
To lock the flat box in the proper position for starting and stopping, squeeze the brake lever at the lower end of the handle. When you are ready to apply the compound, lay the box wheels and blade flat against the joint. Release the lever. Apply pressure to start the compound flow, and draw the box along the joint. Near the end of the joint apply the brake, ease off on the pressure and remove the box in a sweeping motion. If you stop the flat box without releasing pressure, you will leave excess compound on the joint.
Switch hands and begin at the other end of the joint. Draw the box along the joint until you pass the previous stopping point, apply the brake, ease off on the pressure and sweep off. Whenever possible, work toward openings with the flat box. Otherwise, it is best to start at the end of a joint and work toward the middle.
On vertical joints, start at the floor and work up about two to three feet. Lock the box with the brake lever and remove the flat box in a sweeping arc. Start again at the top. As you reach the finished part of the joint, repeat the locking and sweeping motion. Finish ceiling joint in the same way. It is recommended to coat all flats first then coat all butt joints starting from the edge of the wet mud on the flats.
Experienced tool users will be able to read the joints, adjust the crown adjustment dial and make the passes to properly coat the flats. A novice tool user may find it easier to make passes with the box, then wipe with a knife for a uniformly finished joint. The wiping process is only used to smooth out the compound, removing minor pinholes, pock marks and flattening any stop marks or extra mud left at the ends of the joints.
The first coating process is now complete, except for cleanup of tools. The tools must be washed with a brush and water (or a water hose and nozzle) after each use. Pay close attention that all joint compound is flushed from all mechanisms. Complete the cleanup by lightly oiling all wear point and mechanisms using any light machine oil. This operation may be done at the end of the day by keeping all heads of tools submerged in buckets of water.
SECOND COAT ALL TRIM AND ACCESSORIES
As in the overlapping process of finishing drywall, when second-coating trim and accessories it is important to use a wider trowel or broad knife than was used on the first. For example, if a 6-inch knife is used on the first coat, then an 8-inch knife should be used for the second coat. If and 8-inch knife is used on the first coat, then a 10-inch knife should be used for the second coat. This is a general rule of all drywall finishing systems. Additional work for making trim and accessories flatter and smoother may be required with wider knives.
SECOND COAT FASTENERS
The 3-inch nail spotter is used to second coat fasteners. Most walls and ceiling may be done while working from the floor. Water may be needed to thin the compound used on the second coat. The fill will be less drastic than the first coat.
Fill the 3-inch nail spotter using the slot adapter with the pump. Make positive contact with the drywall surface at the beginning of a row of fasteners. Apply moderate pressure to start the compound flow and draw the tool along the row. After passing the last fastener, come away from the wall in a sweeping motion. The nail spotter blade skims off excess compound while leaving a slight crown over each fastener.
COAT OFF-ANGLES AND COAT HANDWORK
Handwork is any area that needs to be coated that has not been addressed in any of the previous processes. This would include repairs around receptacles, outlets, lighting fixtures, pipes, HVAC equipment, and any areas that require additional repair. Off-angles need to be one-sided at this time, as well.
The topping coating process is now complete, except for cleanup of tools and final walk-through. The walk-through inspection ensures that all flats and angels are coated, detail is completed, and fasteners, bead and trim are second coated. Staging for the next day’s work can be evaluated to continue with the automatic taping and finishing tool system.
TRAINING TIPS
In every training class one of the most commonly asked questions is how to coat and finish a butt joint. Over the years, we have witnessed several successful methods for coating and finishing butt joints. In every method there are two consistent applications; one coat that is applied over the center of the tape to flatten out the hump (or point), and another coat that is split on each side of the butt joint to feather it out flat to the drywall. When these applications are followed properly, the result is a flat butt joint.
